It’s not just about saving our code somewhere in a generalized place so that it is easily backup. It’s not only for being able to work with someone else on the same piece of code. When used from home, it’s main used is to keep you sane! You will probably be the only person who will be accessing your SCM at home, but it doesn’t make it less useful. Have you ever thought, “Oh, I wonder how the code would work if I’d changed this”? Whenever you have a working version of a software and that you ask yourself that question, which might break working code for a few hours, you need a SCM. This will allow you to have a source directory structure that works at one particular time. If you are about to make major changes to a working product, check in your current progress and label it if it’s needed. You can then do major changes and if you don’t like it, come back to your original changes, guaranteed. Also, if you work on a few days and think you have introduced a bug, you can do diff on your files to see where the bug might have crept in. There isn’t a day that go buy where I work on code that I don’t use a SCM, it’s that useful!
I do not know how many people do not use SCM when coding from home, I’m guessing most probably don’t, especially if the programming is more informal rather than professional in nature. If it’s professional and linked to any delivery, then I hope you do have a SCM working for you. I would also invest in a local backup system for that SCM and look at an offsite backup system for that rare case if your house burns down. I’ve already told my wife, “You grab the baby, I grab the Synology server and we meet at the front of the house”. I don’t have an offsite backup, but I might be looking into this year if my moonlighting work requires it.
For those of you that don’t have a backup solution, this article is for you. We’ll try to setup a Perforce SCM solution. I have been using a Perforce client on my Windows PC for many years now. We’ve also used Perforce in combination with Jira, which is a bit more process driven. In my work environment, I can’t checked in a change list without have first written a Jira issue describing in details why I’m doing the check in. In a home environment, we’ll probably very rarely need such an elaborate process. You might still use a bug tracking tool, but if you are one or two developer, it will probably not require you to have it tied to your SCM. If you have the patience for it, great, but in my experience, it would add too much overhead for the work I personally do at home.
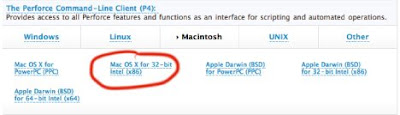
Because I already use Perforce at work and at home, I’m going to describe how to do a similar setup, but for Mac OS X. First thing we will do is to download a few tools from the Perforce Web Site. Once here I download the Macintosh version of the visual client P4V, the command line tool P4 and the server P4D.


Installation
Once you have everything downloaded, then comes time for the install. First thing to do is to move the file downloaded to some useful directory. I’ve created a Perforce folder under Applications to which I then moved my p4v.dmg, p4 and my p4d file. Once moved, you will probably need to use Terminal to go to that directory and make the p4d file and executable file. Go to which ever directory you put your files in and execute chmod +x p4d, do the same for the p4 file. You might want to move the p4 file in a more useful directory, which would be under $PATH. The reason is that we want to be able to start this program from any directory that we would be working . /usr/bin might be a good choice, so lets move it into there. Go in your download directory using terminal and once you are in the correct folder, move the p4 file using the command mv p4 /usr/local/bin. Hmm, did that not work? Protected directory you say? Instead try sudo mv p4 /usr/bin, this runs the same command, but as a root user which is needed to access certain directory.
Running
Now that everything is installed, let’s try running the visual client, P4V. Go into the applications directory where you installed the P4V.dmg file and click on it. You’ll see a p4Merge and a p4v in the mount. Let’s copy those directly in the applications folder we created instead of keeping them in the dmg file. Now run p4v and you should see something like:

Maybe the 1666 is instead a $P4PORT environment variable, but it will be something close to this screen in either case. Because perforce isn’t a known host, we’ll go ahead and changed this to localhost or 127.0.0.1, either should work. For the port, you can either hardcode it to something specific like 1666 or use their environment variable and set it something similar (1666 is the default set by Perforce).
Before we can go forward here, we’ll need to start the Perforce Server. On my Windows installation, I did not need to install a perforce server since I could just us the filesystem directly instead. This doesn’t seem possible with the Mac version. To start the Perforce server, navigate to where you installed the p4d file using Terminal and the simplest way to start the server is by calling simply ./p4d. If you want to use a different port than the default, you would need to use the -p flag and specify the port as such: ./p4d -p 2666. If you want to be able to launch the process in the background and forget about it, you can append a & character at the end of the command line.
One thing that you should know about launching the server in this way is that it will create all the file necessary to run the Perforce SCM under the root directory. So make sure that you are ready to have your file saved in this directory before you proceed. If you do want to change the root directory of the server, you can either provide a -r followed by the directory path you do want to use, or create an environment variable named P4ROOT that does the same. On my own setup, once I’m finally done, my command line looks something like ./p4d -p 1666 -r ~/Documents/Perforce/&
As you can see, I created another Perforce directory under my ~/Documents folder. This will be easier for me when I will be doing backup, since I might not normally backup my Applications folder, but I do backup my Documents folder.
With the server launched and ready, we should be able to create our own user! In the p4v application we launched earlier, we can see a User field, click the New button on the right of it. This will ask you to fill in your user name, full name, password (although optional) and email. Once you have filled all this information, you then need to fill in a workspace if you need one.
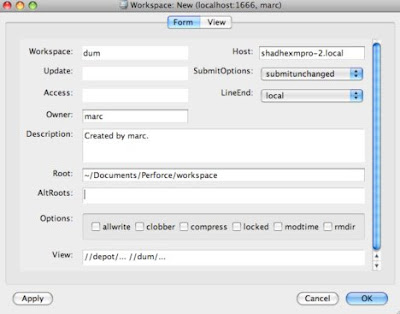

Here is p4v, started and ready to go. You can now drop files under that directory and submit them, you can then revert, compare, check out and check in all of your source file for greater control over your home project, little or big.
Next time we’ll look at the integration with XCode

No comments:
Post a Comment